Hi everyone I am new to blogging and I want to show that there are ways to make your party beautiful and unique without spending lots of money.
I spent a good month and a half researching ideas and working on this on weekends and after getting off my normal Mon-Fri job. I tried to get as much done as early as possible. I would go to Hobby Lobby every weekend to get some inspiration to make this a unique Barbie/Zebra party. Now my inspiration can be yours!
________________________________________________
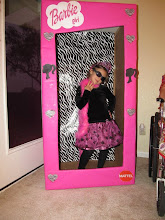
My First project: Barbie box Photo booth
There was a large moving box that was going to be put in a dumpster at work. I knew I wanted to do something with it, but it just hadn't come to me right away. I loaded it flattened into my small Honda car and took it home. It sat in the Garage for 1-2 weeks while in the research process. I was thinking of making a Barbie car and have the girls sit in it for pictures. I couldn't find any examples of how to make a cardboard Barbie car so I changed the idea to a Barbie Box Photo booth. I came this idea while searching Google images.
Lisa from hamptontoes made a box that gave me inspiration to try my own. Here is her Barbie box.

Here is mine. The boxes are similar but I added my own twist and design. I also made my box on a shorter scale for a range of 3-7 year olds could fit and look normal. The wording on top says "Barbie girl".
Cost to me: Less than $9.00
Box- Free
Pink wrapping paper 5.99 - Hobby Lobby 40% off coupon=$3.60 (half a roll still left)
Zebra wrapping paper Party city $4.99
Clip Art from Internet- Free
Tape- on hand
Cost to me: Less than $9.00
Box- Free
Pink wrapping paper 5.99 - Hobby Lobby 40% off coupon=$3.60 (half a roll still left)
Zebra wrapping paper Party city $4.99
Clip Art from Internet- Free
Tape- on hand

I love how it turned out, it was a great activity to do at the party!
______________________________________________
My Second project was to make a simple paper mache pinata and then Decorate it to match the theme of the party.
I looked for "How to" posts on the Internet.
I used: a punch balloon (Hobby Lobby)
Lots of newspaper cut in strips
The paper mache mixture recipe found online (Family Fun)
a bowl to hold the balloon steady
Wait a couple days to dry fully.
After the drying stage use a knife to cut a flap for the candy to go in. The balloon will pop(remove balloon from the inside of the pinata). Also, keep in mind you will need to hang the pinata so attach a hook(metal hanger) near the top.
I used crepe streamers and made a pattern to match my theme(be creative and just know, it is impossible to mess up).
use store brand kid's liquid glue to attach streamer decoration.
Cost to me: $4.50
Punch balloon- $1.99 for 3 (2 still left)
Flour, water and sugar- on hand
Newspaper- on hand
Wire hanger- on hand
store brand kid's liquid glue- 50cents
Crepe streamers Pink, Black and White- on hand
Zebra Crepe streamer- 1.99 (plenty left for another project)

I like how it turned out. Not too bad for my first try! I Wanted the Pinata to look like an Ornament since her party was in December. I could add tin foil to the top(near the hanger to further resemble an ornament)
_________________________________
My Third project was a Bow holder. I wanted to make these as a Party favor. The girls loved them. I made approx. 25 Bows(4 different ribbon styles) and the girls picked their favorite.
Cost to me:
Wood letter- Hobby Lobby $2.50
Ribbon- (made long to hold 25+ bows) 3.00
Acrylic paint pink and black- on hand (used in another project that will follow soon)

I used a wood Letter and painted it with Acrylic paint and with the help of a stencil and in some areas I free hand painted the Zebra stripes.
I hot glued Ribbon to the back of the letter on the bottom and on the top as a way to hang it.
__________________________________________________
I will post more projects soon!
Adorable! I wish I had girls,but alas our next birthday will be Angry Birds :)
ReplyDeleteLori from
www.youhavebeenframed.blogspot.com
I'm having a Barbie party for my daughter and been looking for Barbie photobooth. May I ask how did you assemble and form the box? Was it a big box? I'm thinking to get some boxes used in the groceries.
ReplyDeleteIf you live in Austin, Tx I would give you this one! But if you don't I will try to describe it. I used a large box short enough to fit my daughter's height and look natural. My daughter turned 6 and is on the shorter side so I used approx. a 5ft box. I used an exacto knife and cut out the design on the front. I pretty much freehanded the top part and made sure the sides were even and left the bottom with a little lip to give the box support. I used box tape to make sure it was sturdy all around. After you have the base finished you can either spary paint or cover with thick wrapping paper. I opted for the wrapping paper. The spray paint would have taken a long time and multiple cans to cover the whole box.The wrapping paper at Hobby Lobby cost under $4. I researched Barbie box costumes and learned a little from each post and then just made it one evening. I will try to post pics of the box in the pre-wrapping paper stage. Thanks!
DeleteI'm in love ! I was planning to do a pink and zebra party for my daughter this coming May. I was trying to stay away from a theme,due to the fact that they can be so expensive, but of course my daughter said she wanted Barbie! I knew with the colors I picked, there had to be some matching barbie stuff out there. You dear have floored me. :) I'm stealing this idea. You are MOM GENIUS!
ReplyDeleteToo cute I just love it! Did you slip over the girls heads or did you create a door? I just have tO do this for my daughter's bray.
ReplyDelete